Every room should have a statement piece–something that acts as a focal point and adds a finishing touch. Unfortunately, statement pieces often cost too much to invest in on a tight decorating budget. I was determined to make something work, so I went for impact over dollar signs and walked out to go pick up something for our home. Literally. I put on my trusty flip-flops, grabbed the dog leash, and walked out the door with my mutt, taking her for an impromptu jaunt around the parking lot, through the landscaping, and under the biggest trees.
About ten minutes (and one very confused dog) later, I came back inside carrying an armful of fallen branches, which I deposited in our dining room for safekeeping from potential rain. When Daniel came downstairs later on I heard a “what is THAT” from the general vicinity of my secret stash, so I sweetly explained to my dear hubby that THAT was our new artwork. He looked skeptical.
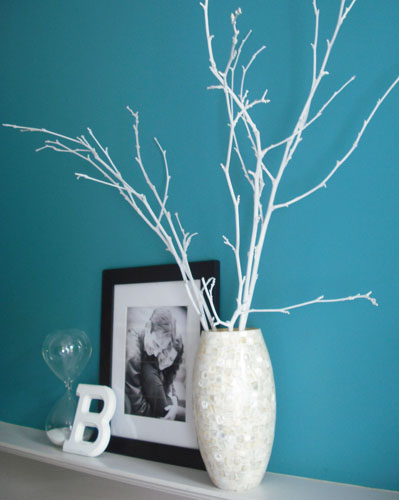
No really. It’s our new artwork. Ever since I minored in art in college, I’ve been a fan of designs that utilize white space to make interesting angles and dramatic “movement.” So I drew from nature’s designs and added a bit of Krylon spray paint to add height to my living room fireplace mantle. For only $6-10 and 45 minutes or so, you can, too.
*****
Supplies Needed:
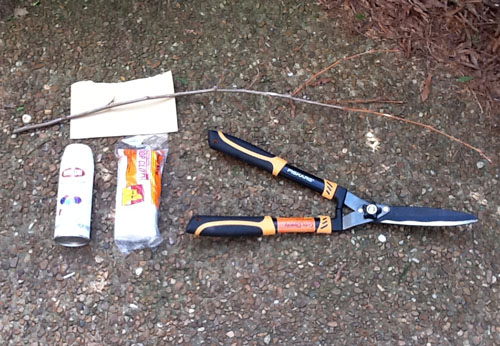
- Small branches
- Krylon Matte Spray Paint (I used white)
- Large plastic sheet or tarp
- Sandpaper (I used whatever I had on hand already)
- Some kind of hedge clippers or a similar tool
Directions:
1. Find some loose fallen branches with interesting angles and nubby bits where twigs are or have been. Make sure they aren’t wet. If they’re damp … let them dry before continuing.
2. Trim the branches to the size needed, clipping twigs to streamline the branch into something that could easily be placed in a vase or other container. Leave enough of the branch bare of twigs so that it can be added to the bouquet of branches and not get too thick and scraggly around the bottom. The final effect should be like a flower stem.
3. Sand off the rough spots where you’ve clipped, where twigs have fallen off on their own, and any nubby patches. Gently blow or wipe off the dust from sanding.
4. Lay out your protective plastic sheet. Place the trimmed branches on the sheet, leaving enough room between each so that the spray paint can cover the entire exposed side. (Note: mine never liked to stay flat, so just be aware of this and make sure to maneuver through all the angles!)
5. Shake your spray paint can to prep the contents. I purchased the more expensive Krylon matte white paint for around $4 at Wal-Mart. You may choose something cheaper or a different color or finish, depending on your preference. However, from other spray-painting tutorials I’ve read, they said to use Krylon for its directional flow sprayer, and I can tell you they ain’t lyin’. That sucker is the BEST. I switched mine to a horizontal spray for this project so I could go back and forth over the branches. Worked like a charm.
6. Let this layer dry for about ten minutes, turn over the branches, and repeat. Continue turning and spraying until you have achieved the coat coverage you desire on all angles of the branches.
7. Let dry for one hour.
And that’s it! Seven simple steps. Now you just have to find the perfect vase to put them in, and set out the whole piece in a spot that could use a little dramatic impact. I used one we had received as a wedding present:
—————————————-
Linked up at:


i love this!! how great! the white is very springy and your room looks great!
Awww, shucks! Thanks so much, Mrs. Cummingsrx.
I just bought spray paint to do exactly this! I plan to use the branches outdoors, because my garden is so shady. Some white should perk it up.
OOoh! Definitely let me know how that goes, Gen!
Pingback: Centsational Girl » Blog Archive » Paint Projects: Party Highlights
I love the classic and crisp look of the white paint – looks great!
Thanks! I’m pretty happy with it, too. 🙂
I just brought some branches in the other day to do the same exact thing.
Ooooh. Jonel, you’ll have to let us know how they turned out. 🙂
I love the white against the teal wall! I have an upcoming project that I’m doing with branches too…I love to see what other people are doing with them!
Thanks, Jena. 🙂 I’ll have to stop by and see your project!
I love how these turned out and wanted to let you know I linked to this post on my blog as things I’m liking! http://kucole.blogspot.com/2011/05/things-im-liking-5611.html
Pingback: How To Paint Tree Branches | Shelterness
Can I ask the paint brand and color of your walls?? I love it! Thank you.
Pingback: DIY!!! | Pearltrees
Nice work and a new idea
I will definitely try for my house
How long do the branches last once they’re spray painted. I’m thinking of spray painting some for my wedding centerpieces but I’m worried about preparing them 4 months in advance. Do they still look as nice as they did when you first spray painted them?
Jess, they lasted wonderfully! I recently threw these out, but three years after making them, they still were looking nice in their vase. The only reason I am not still displaying them is I wanted a change of pace.
Congratulations on your upcoming wedding!
Jess I was wondering the same….do you have Pinterest
I do have a Pinterest account under my name, Andrea Brame. I have not updated this blog in quite some time, but I haven’t taken it down in case it will help others. Stop by Pinterest, though! I keep updating my decorating and organizing boards regularly.
Great idea. Thanks for sharing.
I had a large (5 foot) fallen branch. Spray painted it white added a garland of holly and lights . I have used this every Christmas for the past 10 years. This year it is getting resprayed and a mistletoe garland.
Love your idea I’m putting under a glass top coffee table. Trying to decide if I should pain or leave it natural and add lights? Oh the possibilities.
Pingback: Top fireplace design trends for autumn/winter 2018