Category Archives: Budget Decor

Accessories Storage Tray + An Inspirational Weight Loss Story

Happy Monday! I hope you had a fabulous weekend. I know I did.

Today, I’m going to talk more in depth about a quick decorating/organizing fix that I used in my master bedroom. (I hinted at it here and here.)

But first I wanted to share one more story with you that ties in with last week’s You Can Do It theme.

I don’t typically post about weight loss (other than to compare it to the self-control required to become neater), but I received an email from Kim from Snug Harbor Bay and wanted to share her son’s story with you. Kim’s son, Tony, struggled with obesity as a teenager and went through a remarkable transformation between his junior and senior years, losing 80 pounds and gaining a significant amount of muscle mass in the process. His outlook on life improved, he was happier, and he began living life to the fullest.

Here’s Tony, before and after:

Can you believe it? You can see from Kim’s huge grin that she’s incredibly proud of her son. His secret was working out an hour and a half each day after school, incorporating weight training and focusing on good nutrition.

According to Kim, “[a]t first his diet consisted of cutting out ALL junk food like candy, cookies, chips, coke and fast food. He mainly ate fruit for breakfast, small lunch of a peanut butter and jelly sandwich and dinner was pasta, steak, chicken or pork chops.” He conquered junk food cravings by eating an apple instead any time he wanted to snack. Apparently, he ate A LOT of apples.

His dedication paid off; by his senior prom he was a changed young man.

If you’d like to read more about Tony’s transformation, check out Kim’s blog post, “A Life Changing Experience.” Tony is now going to college and is focusing on a career in nutrition and fitness, with a specific emphasis on overweight children, although he wants to help adults as well. He is also blogging to inspire others to lose weight and enjoy a healthier lifestyle. To follow Tony’s ongoing tips as he maintains his physical fitness level and weight, go to his blog, Tony’s Nutrition and Fitness Tips.

Congratulations, Tony! What a wonderful story of perseverance and accomplishment.

And now … the quick fix I promised.

While I was taking photographs of our master bedroom for the Home Tour Tuesday I posted a couple of weeks ago, I realized that I had quite a few bracelets, rings, and various accessories that were just sitting on my dresser, making it look messier. I didn’t know what to do with them. I wanted to find a way to make them easy to access and, at the same time, incorporate them into my decorating theme. I have a lot of white accents in our bedroom (they pop so well against the dark gray-blue walls), so I really wanted something white to jazz up that dresser. What could I do, without spending more money?

Then a light bulb went off. Aha! I could repurpose something I already owned!

I left my bedroom, went straight to the kitchen, and came back with a white ceramic serving tray from Bed, Bath, and Beyond. We had gotten it as a wedding present two years ago and it has been used at several parties since then. I love its simple lines and it is great for serving cheese and crackers.

And also, apparently, for displaying jewelry and accessories! Who knew? I love how my sunglasses look so special sitting on that white tray, even though I bought them at Marshalls for only about $9 each. To add even more repurposed storage, I also grabbed a white ceramic ramekin to hold my loose rings. I then added a sweet little crocheted heart from Megan E Sass, just for a bit of charm and whimsy. (Why, yes, that adorable headband is from her, as well. It fits so neatly in that third divided compartment on the tray.)

Let me tell you, now that I have a special place for them, I like to keep them there when I’m not using them. I used to toss my glasses on any available horizontal surface, but now I put them back in “their spot.”

It is so good when objects have a home.

How about you? Do you have a repurposed item in your home that does double duty? What turned on the lightbulb in your mind? Do tell!

p.s. Guess what! While my friends were so kind to share their guest blog posts last week, I sneaked off to soak up some rays in the Caribbean! Now that I’m back home, I’ll be sharing some organized travel and packing tips (and vacation photos) soon. 🙂

2 Comments

Filed under Balance, Budget Decor, Containers, Life, Organizing, Storage

Home Tour Tuesday: The Master Bedroom

Ta-da! It’s Tuesday. Every Tuesday, I reveal a new area or room in our home. Since we’ve just moved in, for now I’m just experimenting with what I’d like to do to improve it or decorate it. Eventually, I’ll show off before and afters. (Can’t wait!) But for now, it’s just the “before” and an explanation of what I’d like to see happen in the near future.

Today’s tour is of one of my favorite rooms in the house. I love, love, love the paint color. Our bedroom has a high ceiling, gray-blue walls, and white accents. I’m working on adding artwork, prints, and pictures on the walls, but for now I’ve just been trying to get it organized. I think I’m almost there!

You can see in this picture that the left-hand bookshelf has a white box on it. I put it there so Daniel could have a place to hold all of the wires and electronic bits and pieces that accumulate on “his” bookshelf. It works pretty well! Someday soon I really need to get him a better nightstand solution, but for now the box and the bookshelf do their job.
For my part, my growing accessories collection has been haphazardly strewn across the top of my dresser for awhile, until I realized I could continue “shopping” in my home and reuse something for an organizational purpose. If you look on the left-hand corner of the dresser, you’ll see a white tray. Guess what? That tray is actually a serving tray from Bed, Bath, & Beyond that we got for our wedding. I’ve used it for parties, but usually it is stored above our refrigerator. Not now! Now it is the perfect place to store my bracelets and sunglasses. I’ve also put a white ramekin I rarely use on top of it, to hold loose rings that I don’t wear every day.
Here are few close-ups of the room. I spy my white owl!:
And finally, a couple of shots from inside the bookshelves. Yes, I know the gold-framed picture of us has showed up all around the house:
So that’s our master bedroom! In a couple of weeks I’ll delve into the master bathroom.
p.s. If you’re new, welcome! I invite you to sign up for an email or RSS subscription to receive updates and budget-savvy inspiration on organizing and decorating your home.

4 Comments

Filed under Bedroom, Budget Decor, DIY, Home Improvement, Home Tour Tuesday, Organizing, Storage

Making Storage From Nothing

There are day, months, and sometimes even years when a “tight budget” means not a cent to spare for any purpose other than food, shelter, gas, and bills. Storage containers cost quite a bit, even in small quantities. Not many budget-friendly (and attractive) solutions fall under the completely free category.

This one does.

I call it Use-What-You-Have-Organizing, a.k.a. Making Storage From Nothing.

I’ve been working on cleaning and organizing our third bedroom/my crafting and shop storage room. During the process, I came across a number of CDs (don’t judge. I’m old school that way. I like to keep the cases.) I needed CD storage to get them off the floor.

In the past, I stored them in a bottom cubby of our Expedit bookcase. Now, however, more of our books occupy that bookcase, so there is no longer room. I needed to find a place to keep the CDs all in one space. Then I realized I had some open-top elongated boxes that were just about the right height. I also had leftover kraft wrapping paper and paper doilies, plus a couple of rolls of washi tape from Japan.

That’s when the lightbulb went off, and my three boxes went from this:

to this:

here’s how I did it:

  1. I eyeballed cutting the size of the wrapping paper to fit across the front side of the boxes. I just placed it against the paper and cut around it, leaving enough length to wrap from the bottom up and around the box lip.
  2. I used packaging tape to tape it down in place.
  3. I cut the paper doilies in half, taped them to the inside of the top lip and folded and creased them over the top, then cut off the edges that overlapped.
  4. I taped the doily down with a small piece of washi tape on each side.
  5. I filled in each box with Tetris-like arrangements of my CDs.

I gotta say, for a set of storage containers that cost, as my wonderful friend Joy says, “free dollars,” they ain’t too shabby.

In fact, I rather like looking at them up on top of the bookcase.

Linked up at:

Toys in the Dryer | Five Days … 5 Ways | Sugar & Spice | A Bowl Full of Lemons | Tip Junkie


Like this project? Pin It. You can find more DIY projects here or subscribe via RSS  to get weekly updates on home organization.

8 Comments

Filed under Budget Decor, DIY, Media, Organizing, Storage

Home Tour Tuesday: The Kitchen

Ta-da! It’s Tuesday. Every Tuesday, I reveal a new area or room in our home. Since we’ve just moved in, for now I’m just experimenting with what I’d like to do to improve it or decorate it. Eventually, I’ll show off before and afters. (Can’t wait!) But for now, it’s just the “before” and an explanation of what I’d like to see happen in the near future.

Today we’re in my kitchen! Oh, the kitchen. I love this kitchen, but it could stand some updating to bring it up to speed. Unfortunately, kitchen remodels are probably the most expensive part of renovating a home, so I’m not sure how much I can do. I’ve been following with great interest the renovations that John and Sherry over at Young House Love have been doing. They’re pretty much making my dream DIY kitchen; I’d love for ours to turn out that beautifully.The harsh truth, though, is that our kitchen isn’t that bad. Sure, the cabinets are the most “in” color right now, but kitchen trends come and go. Yeah, we don’t have the stainless steel appliances that are in demand, but we have excellent black appliances that are in great shape and much better than any other appliances in rental kitchens I’ve come across.I dream of an overhaul that will catch home buyer’s eyes and make our duplex stand out in the crowd when the time comes for my dad to sell, but the reality is probably I will manage to add a tile back splash, new faucet fixtures, and maybe stylish cabinet knobs and hardware, and that’s it. If I’m really lucky, that renovation will include a granite counter top.

Outside of the annoying and awkward overhang on the peninsula (shown here, in our living room tour), the most annoying things currently about our kitchen are the lack of shelves tall enough to hold cereal or cracker boxes (see above, how we store them currently as a result), and that the two lower corner cabinets are just big old black holes under the counter, with no shelving or lazy susan to help with storage. Seriously, who does that? We’re going to need to fix that issue somehow. I’m still working on it.
If you look closely, you’ll see my husband working in his native habitat.
Sorry about all the color changes in lighting. Apparently while the iPhone is great for natural light photos, photos with variances in lighting have significant color fluctuations. Sigh.
I’ve been fiddling with the idea of downloading the IKEA kitchen planner to see what I could do with this space. Has anyone used this tool?
p.s. If you’re new, welcome! I invite you to sign up for an email or RSS subscription to receive updates and budget-savvy inspiration on organizing and decorating your home.

Leave a comment

Filed under Budget Decor, DIY, Home Improvement, Home Tour Tuesday, Kitchen

Home Tour Tuesday: The Living Room

Ta-da! It’s Tuesday. Every Tuesday, I reveal a new area or room in our home. Since we’ve just moved in, for now I’m just experimenting with what I’d like to do to improve it or decorate it. Eventually, I’ll show off before and afters. (Can’t wait!) But for now, it’s just the “before” and an explanation of what I’d like to see happen in the near future.

Today’s tour is the room we spend our most time in–our living room. We watch movies, read, and sometimes eat in this room together. I blog, write, edit photos, list items for sale, and relax in this room. While Daniel spends most of his time working in the office, I like being able to turn the tv on during photo editing sessions, or keep up with the laundry and dishes while writing a blog post. It really is a living room.

Basically, it takes a beating. Our favorite spot for coats is hanging over the back of a chair (much to my chagrin) and it doesn’t take long for it to look cluttered or dirty due to all the functions it performs and all the traffic the floor gets.

Here is what it looks like currently:

… from another angle …

And here is what I’d like it to look like eventually:

Living Room Inspiration - Behind Closed Drawers

Painting, a lighting fixture/fan update, new tables, possible wood flooring, a fix for the awkward space between the chairs and the kitchen (bookcase installed under the counter overhang maybe?), curtain rod and drapes, and decor is all in the plan.

But whatever other improvements we make, we need to purchase a rug. I’ve had my eye on ivory flokati rugs for some time, but I have to admit I’ve been nervous to take the plunge. You have to rake them, for goodness’ sake, and they aren’t exactly kid juice friendly. We don’t have kids currently, but we do have friends and family with kids, so it doesn’t hurt to be ready for spills and messes.

I’ve considered a patterned rug, but if we go that route I’d like a simple geometric pattern and I’m picky and we have a limited (small) budget and Overstock.com only carries so many items in our budget … so … um … yeah. The hunt continues  and the money we’ve saved up stays stashed away.

It’s all a work in progress.

p.s. If you’re new, welcome! I invite you to sign up for an email or RSS subscription to receive updates and budget-savvy inspiration on organizing and decorating your home.

Leave a comment

Filed under Budget Decor, DIY, Home Improvement, Home Tour Tuesday, Living Room

How to Spray Paint a Thrifted Owl Figurine

So I met this little guy in a Goodwill in East Tennessee over Christmas. (You may remember him from my Instagram picture “Mr. Hoo” post a few days ago.) Not only had he been cast off once–but twice. He was sitting behind the check-out counter, where somebody had rejected him yet again.

Poor little sad owl.

I had been getting something else at the checkout counter, but I asked the sales lady about him and if he was for sale or was being processed and she told me somebody had decided against buying him, so yes, he was still for sale. I scooped him up for A DOLLAH.

He came home with me, and this weekend I gave him a little owly makeover and thought I’d show you how to do the same thing to a thrift store owl. Funny how things that were all the rage in the 1970s can come back reincarnated as hip 2012 tchotchkes!

Here’s what you need:

Here’s what you do:

  1. Make sure your temperature is acceptable for spraying. I think I just barely cheated on this one. The bottle said to use at 65 degrees Fahrenheit or above. I’m pretty sure by the time I got to spraying him over the weekend that the temperature was barely that. Our mild Tennessee weather has been weird lately, and it felt more like spring, so I thought I’d risk it.
  2. Take the owl figurine, cardboard, and spray paint outside. Safety first! You don’t want to be breathing those paint fumes.
  3. Place your owl on the cardboard box (or newspaper) to protect your grass or other ground surface.
  4. Shake the spray can thoroughly. My can recommended 2 minutes.
  5. Spray 8-10 inches away from your owl, in even strokes. Don’t worry if it isn’t 100% covered on the first go-round. It took me two heavy coats.
  6. Let your owl dry between coats. My can said I could recoat after just a few minutes and he’d be touch-dry in 40, so I gave him 45 minutes after each coat before handling it again, just to be safe. I used my microwave timer to let me know when to go outside and spray again.
  7. After two even coats, your owl should be ready to go!
  8. Let him dry for 45-60 minutes before handling. I made the mistake of getting a smudge on his belly. I rubbed it down with some water on my finger and it seemed to go mostly away. It was like I had just gotten a manicure and then smudged a finger on the way out the door. So close, and so frustrating!
  9. Ta-da! You have a rejuvenated owl figurine to display.

Pin It

I love my little guy. He’s so darn cute. I used glossy white Valspar spray paint on him and I’m pleased with the result.

Side note: the entire time I was working on this project, Daniel and I kept making “rotate your owl” references. I couldn’t help it. So, hey, I hope this little how-to post helps you spraaaaay-paint / spray-paint your owl /spray-paint your owl for sciiiiennnce!

But back to the “how-to” part … I learned a few things during this his transformation.

First, take the wind into account when you decide where to paint. I had to hold down the box with a heavy object while he dried, so the cardboard wouldn’t be lifted up by the wind and topple him over. I also had to pick out a couple of dry pine needles the wind had blown on him while he dried. Second, after he was done, I read that I probably should have coated him with a primer spray first. Oops! We’ll see how his paint holds up on his ceramic base. I suspect he was one of those homemade ceramic pieces that were so popular years ago. Or he could be younger than 30-something. Who knows. All I know is he’s a handsome little devil now.

Happy Monday!

If you’re new to this site, welcome! I hope you’ll look around. Start here to learn more about my organizing journey, or subscribe by RSS. See you soon!


—–

Linked up at:  I Heart Naptime | I Heart Organizing | House of Hepworths | Bowl Full of Lemons
Tip Junkie handmade projects

5 Comments

Filed under Budget Decor, DIY

Home Tour Tuesday: The Dining Room

Ta-da! It’s Tuesday. Every Tuesday, I reveal a new area or room in our home. Since we’ve just moved in, for now I’m just experimenting with what I’d like to do to improve it or decorate it. Eventually, I’ll show off before and afters. (Can’t wait!) But for now, it’s just the “before” and an explanation of what I’d like to see happen in the near future.

Today’s tour is the first room off of the entryway from last week–our dining room. Most of our downstairs is an open plan, but the dining room is set off by itself so it has a more formal feeling.

So here is our plain vanilla dining room. Mid 90s builder basic at its “best,” no?

And a few more close-ups from various room angles:

Overall, it is a very serviceable, decent dining room. Yawn. It plays its role well, and we use it on a regular basis. I am even planning to entertain there soon, as Daniel and I enjoy opening up our home to friends and family for dinners or parties occasionally. (Why wait for something to be perfect? We’re gonna enjoy our home now, despite its flaws!)

That being said, my goal is to makes the room feel richer and more vibrant by adding texture with patterns and bold punches of color.

We don’t have the money for a full overhaul; everything we do will be on a tight budget with lots of elbow grease instead of dollars. So, for this room’s upgrade, I’m hoping to add some DIY wainscoting, paint rich color on the upper part of the wall, and install a more modern light fixture. We’d also like to update our dining room table and chairs. I’ve been haunting Craigslist for about a year … eventually we’ll find one we like and can afford.

In addition, the current window sheers are a terrible burnt yellow color. I’m living with them for now, but, trust me, they will be one of the first things to go!

In the end, I’m hoping it will look something like this:

Dining Room
Much better, dontcha think?
p.s. If you’re new, welcome! I invite you to sign up for an email or RSS subscription to receive updates and budget-savvy inspiration on organizing and decorating your home.

1 Comment

Filed under Budget Decor, Dining Room, DIY, Home Improvement, Home Tour Tuesday

Our New Office

Ever since I first began browsing through home decorating magazines (before blogs were popular) and then blogs, and then Pinterest, I have loved the look of white-on-white rooms, especially loft apartments or offices. The blank canvas of the walls would always be accented by punchy graphic prints and colorful art or quirky eclectic collections.

That’s why Daniel and I chose Behr Polar Bear white for our new office paint color. (With the exception of one wall which will be 75% Idea Paint whiteboard paint and 25% nearly-lime-green aka Behr Japanese Fern or something like that.)

Today is my man’s 30th birthday (Happy Birthday, Babe!) Last night I stayed up waaayyyy late to get our office ready for his first birthday present. He’s been really wanting our office to be completed. So I finished the last paint touches on all but the soon-to-be-whiteboard wall and dressed the place up with already existing pictures and items we had on hand.

Ta-da!

I have to admit, this is my favorite nook! The typewriter is an Underwood and was passed down to Daniel by his grandfather. The “art” is a T.J.Maxx pet placemat for the floor that I framed. The plant I got from the Nashville Farmer’s Market. I got it months ago and haven’t killed it.  This is amazing.

Slightly blurry view of the desks … sorry. Still getting used to my iPhone.

Other view of the office, birthday edition!

Print station, with Kenyan Rhino carving

Sock monkey!

Hatch Show Print find

Limited edition Princess Bride  print from Movies In Haiku at Etsy.

And finally, my favorite birthday boy in his new office …

The weather was beautiful and warm today, the leaves were gorgeous, our celebratory pumpkin cheesecake and coffee with caramel creamer was delicious, and the company was fantastic. Really, I couldn’t have asked for a better first day in the new office.

1 Comment

Filed under Balance, Budget Decor, Home, Office, Organizing, Painting

The Cheater’s Guide to Hanging a Type Drawer as Decor

During my mad weekend makeover of our dining room, I kept telling Daniel that I needed something with some oomph to put on the wall. Something that would tone down the girly-ness and not cost too much.

I searched high and low in our house, only to discover that 90% of my vintage “stuff” that I like to swap out from room to room was too small, or just plain impossible to hang on a wall.

That’s when I re-discovered my type drawer. It was a gift from my mother and father back several years ago and I was so excited to get that gift, but I never did anything with it! Finally, it went to use, but first it needed a little TLC of the MacGyver variety.

Here’s how it looked before I got to work:

I took a good look at it and realized 1) there was a LOT of grime on those sections of the drawer, and 2) there wasn’t a way to hang it up on the wall.

I grabbed a couple of old rags, wire cutters, a hammer, a can of Kleen Guard spray, and an old frame I had picked up at a Goodwill store a few years back.

First, I stole the hanging wire from the back of the old frame, cutting it on each side as close to the nails as possible.

I took my cue from the old frame and grabbed a couple of nails from our stash. I figured if they could jerry-rig it that way, I could, too.

I set the wire and nails aside for a few minutes and took up the rags and Kleen Guard spray. I had no idea what I had just signed up to do …

I sprayed all over the tray drawer several times and rubbed hard with the rags for each application. If I was being a little more obsessive compulsive about the process, I probably would have grabbed an old toothbrush or cotton swabs or something to get in the crevices. There were A LOT of partitions to clean.

After about a thirty minutes to an hour of elbow grease later, this is what I had to show for it:

Ewwww. GROSS.

Still, I had to wonder if some of that grime was actually from the time when the drawer had been used. While part of me felt a bit alarmed at the idea of lead touching some of the areas (the graphic design layout term “leading” actually comes from actual use of lead to separate lines of text), the other part felt an odd sort of excitement that I was coming in contact with history. I daydreamed a bit about what kinds of printed matter the type was used to create, and where the drawer could have been from. This is why I love vintage things. You touch the stories behind those things.

My drawer “cleaned up good”, as they say. See?

After cleaning, though, I took up my hammer and nails and tried to figure where was the best point on the back of the drawer to hammer the nails into for support.

I tested the length of the wire to make sure at its fully-extended length when hung on the wall would not extend above the top of the drawer. Then I realized I didn’t have quite enough wire to stretch from the sides to that point. I decided to improvise and found two partition pieces wide enough to support the nails and drove them in there. I then hammered the nails down so that they bent sideways and trapped the wire.

And that’s it!

Leave a comment

Filed under Art, Budget Decor, Dining Room, DIY

How to Spray Paint Branches

Every room should have a statement piece–something that acts as a focal point and adds a finishing touch. Unfortunately, statement pieces often cost too much to invest in on a tight decorating budget. I was determined to make something work, so I went for impact over dollar signs and walked out to go pick up something for our home. Literally. I put on my trusty flip-flops, grabbed the dog leash, and walked out the door with my mutt, taking her for an impromptu jaunt around the parking lot, through the landscaping, and under the biggest trees.

About ten minutes (and one very confused dog) later, I came back inside carrying an armful of fallen branches, which I deposited in our dining room for safekeeping from potential rain. When Daniel came downstairs later on I heard a “what is THAT” from the general vicinity of my secret stash, so I sweetly explained to my dear hubby that THAT was our new artwork. He looked skeptical.

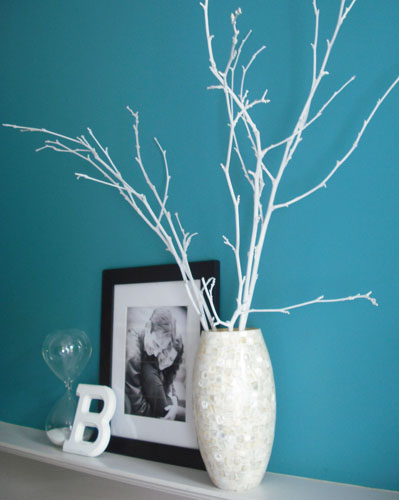
No really. It’s our new artwork. Ever since I minored in art in college, I’ve been a fan of designs that utilize white space to make interesting angles and dramatic “movement.” So I drew from nature’s designs and added a bit of Krylon spray paint to add height to my living room fireplace mantle. For only $6-10 and 45 minutes or so, you can, too.

*****

Supplies Needed:

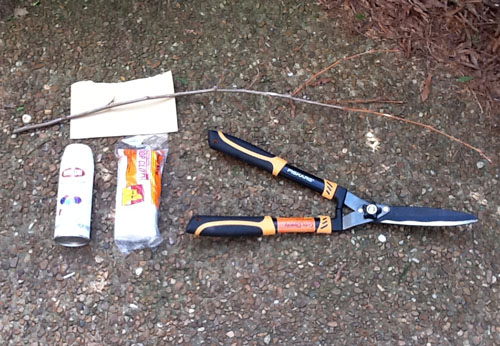
  • Small branches
  • Krylon Matte Spray Paint (I used white)
  • Large plastic sheet or tarp
  • Sandpaper (I used whatever I had on hand already)
  • Some kind of hedge clippers or a similar tool

Directions:

1.  Find some loose fallen branches with interesting angles and nubby bits where twigs are or have been. Make sure they aren’t wet. If they’re damp … let them dry before continuing.

2. Trim the branches to the size needed, clipping twigs to streamline the branch into something that could easily be placed in a vase or other container. Leave enough of the branch bare of twigs so that it can be added to the bouquet of branches and not get too thick and scraggly around the bottom. The final effect should be like a flower stem.

3. Sand off the rough spots where you’ve clipped, where twigs have fallen off on their own, and any nubby patches. Gently blow or wipe off the dust from sanding.

4. Lay out your protective plastic sheet. Place the trimmed branches on the sheet, leaving enough room between each so that the spray paint can cover the entire exposed side. (Note: mine never liked to stay flat, so just be aware of this and make sure to maneuver through all the angles!)

5. Shake your spray paint can to prep the contents. I purchased the more expensive Krylon matte white paint for around $4 at Wal-Mart. You may choose something cheaper or a different color or finish, depending on your preference. However, from other spray-painting tutorials I’ve read, they said to use Krylon for its directional flow sprayer, and I can tell you they ain’t lyin’. That sucker is the BEST. I switched mine to a horizontal spray for this project so I could go back and forth over the branches. Worked like a charm.

6. Let this layer dry for about ten minutes, turn over the branches, and repeat. Continue turning and spraying until you have achieved the coat coverage you desire on all angles of the branches.

7. Let dry for one hour.

And that’s it! Seven simple steps. Now you just have to find the perfect vase to put them in, and set out the whole piece in a spot that could use a little dramatic impact. I used one we had received as a wedding present:

—————————————-

Linked up at:

Centsational Girl’s Paint Projects Link Party

Tip Junkie handmade projects

24 Comments

Filed under Art, Budget Decor, DIY, Living Room